This time we'll explore how to turn electricity on and of on demand.When I say on demand, I mean using programming. If you are not familiar with programming, now is the time to be scared. It is intimidating, but I promise you that it is worth your while. For now, stick with copy/pasting code - HOWEVER, once your project works, you are in a brilliant position to poke around with it. And so - do! Change stuff, observe what it does. If it breaks, undo the change and try a different way. That is, without a doubt, the best way to learn these impossibly complicated fields.If you are using Tinkercad and go to the Code pane, you have three edit modes available. Feel free to choose whichever you prefer. Blocks might be better for you to visualize what you are doing, but at the end of the day, they represent code, and super complicated code will be represented by a super complicated structure of blocks anyway. This is why I recommend you bite down on something tough and go with code. I will certainly be dealing in code in these examples.
This lesson's circuit
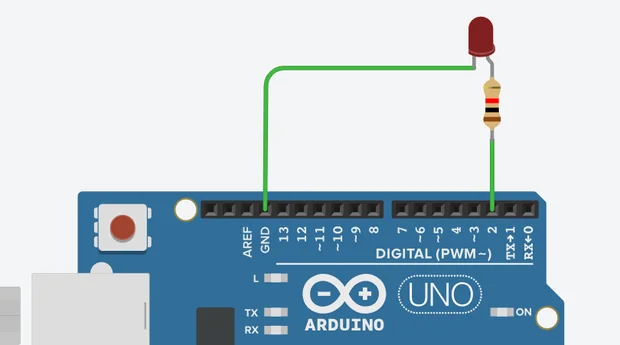
To build this project, connect pin 2 on an Arduino to a 333-ohm resistor. The other end of the resistor to LED+ (longer leg) LED- (shorter leg) to GND on Arduino And that's it.Now go to the Code pane and switch the edit mode to Text. You will already have some code present here. The funny thing is that this code does pretty much the same thing as what we came here to do. But don't worry, if you do it yourself, it will be better anyway. But! If you want to challenge yourself a little, copy this code someplace for a minute and when we are done with this excercise, you should be able to understand what the default code does. And you may be able to combine both codes to work at the same time.There are two sections here. Setup and Loop. If you think of Arduino as this sort of a 'dumber' computer, you can imagine those two sections like two pieces of paper with instructions on them. When Arduino is powered on=starts working, it will take the Setup paper, do what's on it, and throw it away. Then it takes the Loop paper, does all the instructions on it, and when done, it loops=goes back to the top of the page and starts the Loop paper again. Indefinitely. In a car, setup would be adjusting your seatbelts, turning on your radio, or placing your phone in a holder - things you do just once. Loop would be paying attention to the road, shifting, or making mean gestures at people—things you need to keep doing the whole time.Now update your code to say this:
// This is a comment, not an instruction

// Setup section
void setup()
{
  // Tell Arduino, you will be using pin 2 to output power
  pinMode(2, OUTPUT);
}

// Loop section
void loop()
{
  digitalWrite(2, HIGH);
  // Delay=wait for 500ms=0.5s
  delay(500);
  digitalWrite(2, LOW);
  delay(500);
}
I added some comments to the code to give you a couple of hint's what is what, but if you don't understand, don't stress over it so much at this point. That comes later. The one thing I didn't explain is the digitalWrite function. That is the core business of this lesson. If we connected LED+ to 5V, it would light up without programming. That's nice. But that way we wouldn't have the ability to turn it off. That's not nice. We can do this kind of stuff with all pins 2 to 13. I chose 2, but it doesn't really matter. Now, digitalWrite only works if pinMode was set to output in Setup and provided that digitalWrite and pinMode are configured for the same port. The way it's used, you see in the code. The first parameter, a number, is the port number. The second parameter is a predefined keyword (or constant). That's why the capital. It can either be LOW or HIGH, which literally means "off" and "on."This is the point where I tell you what the code does. But I won't, because I believe that at this point you have enough information to figure it out on your own. And if it still doesn't make sense to you, just run it and tak a look at what it does :)!Bonus! When I said, there are two sections, I lied. Or rather, I made things a little less complicated, because the truth is not necessary at this point. The truth is that there are two functions that Arduino will search for when powered on. And those sections, they may be functions and they may be other stuff. There may also be stuff outside of any sections, such as variables. If you're interested, give the following code a try. It does exactly the same thing as the one before, but the code is different. Can you spot the difference?